


|
|
||||
| |
|||||
|
|||||

 |
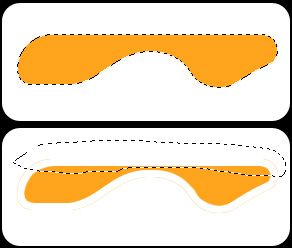
Here is the tutorial for applying the aqua button effect on complex shapes and patterns. The effect is also possible on darker backgrounds (even black) by using a darker color for the base color of the pattern. You also might need to use the eraser and airbrush tool on some occasions to correct the highlight areas on very complex shapes or patterns. |
|
 |
||
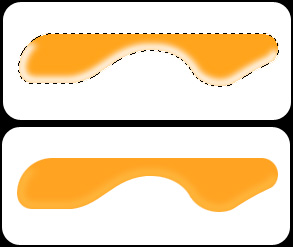 |
Go to the pattern layer then load a selection around the pattern, Then go back to the stroke layer then apply the FILTER > BLUR > GUASSIAN BLUR filter. The amount I used for the blur is 2.7 but this value will vary depending on the thickness of the stroke. You can then release the selection after applying the blur. Fade the stroke layer by changing the blending mode of the layer from Normal to Softlight. Adjust the layer opacity of the stroke layer to 50% to help fade the highlight more. |
| Create a new layer while the selection is still loaded and then contract the selection by 3 pixels (amount will change depending on size of the interface). Apply an inside stroke using 4 pixels for stroke thickness and white as stroke color. Do not release the selection after this step because you will still need it for step 4. |
 |
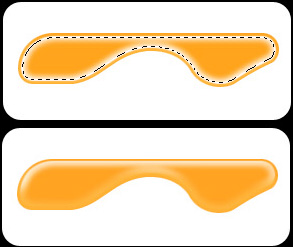 |
Apply again the FILTER > BLUR > GUASSIAN BLUR filter. I used the same amount of 2.7 for the blur filter similar to the amount used for the lower highlight. You can then release the selection after the blur. Apply the FILTER > BLUR > BLUR two times at the highlight layer then erase the lower portions of the highlight by using the eraser tool with a soft brush and you are done. You can reduce the opacity of the highlight layer if the highlight comes out too strong. |
|
Go
Back |
|
Images and content Copyright © 1998-2001
Ryan Lacdao Bandwidth by Philmetro |
|
Your Javascript is Turned Off. Please turn
on the Javascript in your browser preferences..
| |||||||||||||||||||||
|
|
||||||||||||||||||||
|
|
||||||||||||||||||||
|
|
||||||||||||||||||||
|
|
||||||||||||||||||||
|
|||||||||||||||||||||